I have something very very special to show you today.
You know I am taking part of the
30 Days Untried Challenge, right? and last night I showed you green polish. Well, Rachel from
Polished Criminails did this real amazing
green mani for this challenge. And I loved it so much, that I just HAD to try it too! And while I did, I decided to take some pics of every step on the way and then I assembled this tutorial so you can all see how easy it is and give it all a try!
 and Eveline Holographic Shine") |
| Taken in direct sun. |
So let's begin: I used the holographic silver polish by Pupa (# 030) as my base. Two coats and no top.
") |
| Taken indoors under artificial lighting. |
Pupa holographic silver shows a very strong linear holo effect but its general look is very flat. I don't know, i like it but... It somehow lack this really great dimention that holo polish usually has.
The good news is - its application is very easy. Despite the small bottle and the round shape of the tiny cap that doesn't really add to its comfort of ise, the small brush is comfortably wide and it spreads nicely on the nail. Also, this is a very pigmented polish and it covers the nail very well in one coat only.
Here you see two coats of course, but if you are careful and don't leave brush strokes - you're good with just one! Drying time is short and happy. And aside for this flatness i talked about earlier, the only down side of this polish is the fact that every scratch is very visible on a nasty way.
") |
| Taken outdoors in direct sun. |
I prepared a small brush (you can use a toothpick if it's easier for you), my striping tape and the colors I wanted to use. I am using several polishes from a brand called Eveline which I picked in my recent trip to Russia. They all have some holo in them. Some a little more linear and some more scattered, but details on these will be on a separate post.
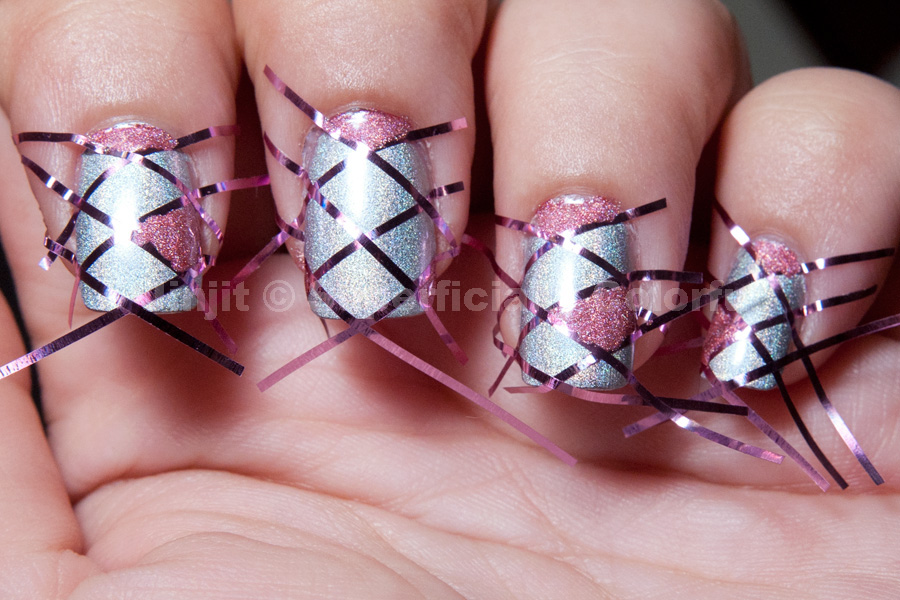
I prepared my tape by cutting lot's of parts. I used 6 cuts on every nail. You can decide how many you want to use. Then I started applying them to my nail in diagonal lines.
Tip: if you layer them on all your nails at once - which is a lot less time consuming then doing one nail at the time, you should consider positioning them all pointing to one side and then place the crossing tapes - again on all nails. This way it will be very easy to know which tapes are on the top row when you take them off.
On your work surface place a drop of one of the polishes. Some tips for you here:
- Arrange your polish in order from light to dark. Using it this way will save you the trouble of having to clean your brush between colors. I'm all for easy work you know
- Use no more then one drop of polish at a time. Its easier to work with a drop outside the bottle then using the polish directly from the bottle. But you don't want the polish to dry or become gooey because then its very hard to paint with it.
- Use a slow dry polish as much as you can. Its much faster to finish all your nails, at least on one hand, before removing the tape . But you don't want the polish to dry because then you won't get the nice clean lines.
Randomly paint inside your diamond, using your colors. It will save you time if you use the first color on all your nails before moving to the next color.
When you're done - just take the tape off. I found that a tweezers is the easiest way to take the tape off without ruining the polish. Do your cleaning as necessary, top coat your design and show it off!
 and Eveline Holographic Shine") |
| Taken in direct sun. |
 and Eveline Holographic Shine") |
| A close-up in direct sun. |
 and Eveline Holographic Shine") |
| Taken indoors under artificial lighting. |
I hope you enjoyed this gorgeous design and the tutorial. I also made a shorter version, in case you want to save it or share around.


 and Eveline Holographic Shine")
")
")


 and Eveline Holographic Shine")
 and Eveline Holographic Shine")
 and Eveline Holographic Shine")


16 comments :
Looks beautiful, but not sure I'd have the patience x
LOVE it! Great job!
now see, why couldn't my mani look so good!!!
Thank you for this tutorial, Jin, this looks amazing!!!!!
This is so gorgeous! I might have to try it, even if it looks a little time consuming. But it definitely seems worth it :)
This Is Soooo Awesome!! Need To Try It Sometime!
Wow great tutorial, Jin! And the end result looks amazing! :D
~ Yun
Oh, Jin, this is AMAZING!!! I have yet to play with any striping tape and this looks like SO much fun!!
You are the talk of the town in one of the polish groups this evening! You have stunned everyone, including me. I'm going to share this on my FB page now! :)
OMG I Love this!! I gotta try it sometime. Excellent tutorial too! <3
Wow, I had no idea that was so easy to do! I'm so excited to try it out. Thanks for putting the tutorial together. =)
Hey sexy hands, you did a great job here! I looooove that design! It's funky and girly and... holo! :D Right up your alley right now, huh?
I don't know if I would be patient enough, but I would definitely want to try..! Too bad my holidays are almost over! *cry*
Congrats again! You really did win my heart with those :D
This is absolutely stunning! :-) Beautiful tutorial, beautiful colours! :-)
Big hello from your new follower! :-)
This is so cool!! I like how it looks with just the striping tape too! but I LOVE how it looks with the diamonds filled in. You hit this look way out of the park!! :) (get it! baseball diamond? no? not funny? ok then! lol)
This is so awesome!
This is beautiful, thanks for the tutorial.
This design is awesome and the colors you chose are gorgeous! I am deeply jealous of all your pretty holos that you used for this--I might need to try it in creams or shimmers, but I don't know that it will "wow" like this! This is really great!
Great mani and also a Great tutorial! It looks si easy This way!
I think I'm going to buy some striping tape and give This a try!
Post a Comment
I love comments and I appreciate each one of yours!
I would love to hear from you but please, refrain from posting links. If you have a link that you want me to see - just email me :)
Thank you so much!